Saturday, September 19, 2015

DIY Lace Boot Cuffs


Well, Fall is officially upon us! My most favorite season. It's time for jeans with boots and comfy sweaters. I have been seeing some really cute boot cuffs floating around Pinterest lately. I jumped on the tall boot with jeans bandwagon last Fall but haven't yet accessorized them properly. After looking at all the amazing options I decided I NEEDED some lace boot cuffs. My poor poor husband! I hauled him and our son to THREE fabric stores on my quest to acquire stretchy wide lace. Do you know how hard it is to find wide stretchy lace in the rural Midwest? People let me just say it is hard. I struck out all 3 times. So, I gave up and was just going to have to look online. Well, our last stop of the day was Wal-Mart. I decided to look and see if they had any boot cuffs. They only had short boot socks. Sigh. Can a girl catch a break? Well the boot cuffs happen to be with the ladies under things and I happened to walk by an end cap when I had a crazy idea. You just never know when or where inspiration is going to strike. Here is what the end cap was full of;  


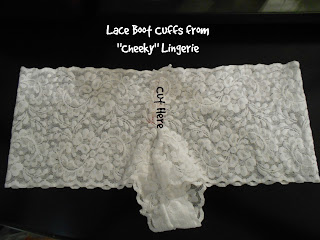
Stretch lace in a manner of speaking. So, I called my husband over and said, "I have a crazy idea!" His response as usual was, "Oh no!" This is because I have so many. I told him I had found my wide stretchy lace and wanted to experiment. Being the ever so supporting loving husband he gave his stamp of approval (not without laughing a lot first) and into the cart they went. I also told him, "If this works I am coming back and buying one of every color!!" There is no doubt in his mind that I will follow through. So, here is how to make your very own pair of lace boot cuffs out of "Cheeky" Lingerie. Buy the largest pair so you have more material to work with.


1. Cut along the seam on both front and back. Don't forget to cut out the finished seam. This gives you 2 boot cuffs. (The above photo is what they look like after being cut.)


2. Fold in half and pin. Sew a straight line and then sew a zig zag stitch over it for reinforcement. Turn right side out and rock those new boot cuffs!! If you want you can add buttons or bows or flowers or whatever you want. Color options are endless.


Total Cost: $2.97 + tax 
Total Time: Maybe 10 minutes

Happy Accessorizing!
Tabitha

P.S. I will be going back for more colors!!

Monday, June 18, 2012

Father's Day

Father's Day was Sunday and it was great!
I'm married to the greatest husband and daddy in the world!! I'm a little partial. ; )  

 Here's the food from the day;
I whipped up this quick, simple, and very yummy chocolate trifle. 

Chocolate Trifle:
1 13x9 chocolate cake (I didn't have a cake mix so, I used a recipe out of my Betty Crocker Cook Book)
2 boxes of chocolate instant pudding
1 tub of cool whip

Start with the cake as the base (crumble it). Then, add a layer of pudding. Last, a layer of cool whip. Repeat until you reach the top.

I made mine sugar free for the guys at church that are diabetic. 

For supper we treated Daddy to one of his very favorite seafood dishes. I saw the original recipe on Rachael Ray but, I don't remember it so this is my concoction. I call it Shrimp Pasta. So original, I know.

Shrimp Pasta:
Shrimp medium or large in size
1 lemon or some lemon juice also works
4 Tbsp butter
onion
garlic
black pepper
cilantro or basil

Melt your butter in the saucepan. Add your chopped onion (just a little amount to taste), garlic (to taste), and lemon. Then, add your shrimp, black pepper, and cilantro or basil. Cook thoroughly. 

While this is cooking boil some pasta and drain.

Add the pasta to the shrimp mixture and toss it all together to coat the pasta.  

Serve and enjoy. The pasta is covered in this rich, buttery, lemony sauce. It melts in your mouth.

My husband says that it's very true at least for him that the way to his heart is through his stomach. I hope all the dads out there had a great Father's Day and got to enjoy some of their favorite dishes too.

Friday, June 15, 2012

Jell-o Fruit Snacks

My son is an absolute fruit snack fanatic. I think he would live on them if I would let him! I'm a really big make from scratch kind of girl. I like to know what's in our food. So, when I came across this on pinterest I thought it would be fun to do with the lil guy and it was!
I got the recipe from here. There's also a juice version but, I had Jell-o to spare.
Here's what they look like all ready to eat!

Setting up in the mold. Before I removed them I brushed a little cornstarch on the backs with a brush. It really helps them not stick together.

I just used a 3 oz box of mixed berry jell-o
2 envelopes of Knox gelatin (unflavored)
1/3 cup water
Put it all in a saucepan over med heat until all the jello dissolves. Poured it into the mold and popped it into the fridge. They were ready in about 30 minutes. I bought the candy mold at Hobby Lobby with a 40% off coupon. This recipe fits this mold perfectly and makes 64 fruit snacks. They are really soft and I store them in an air tight container in my fridge. They don't have a long shelf life but we have no problem with that around here!
Tip: Immediately fill your saucepan with hot water after pouring the jello into the molds. If you don't it will stick pretty good to your pan.

I like this because it's fast, easy, and inexpensive. I bought the jell-o on sale + used a coupon= super cheap jello. They are also fun to make and lil man likes taking them out of the mold and popping them into his mouth!


M&M Boutonnieres


I wanted to do something fun and different for the men at church for Father's Day. Every year they give us flowers. I wanted to do a boutonniere but not with flowers. They all have a sweet tooth so I googled candy boutonnieres. I found lots of pictures of the finished product but no tutorials. I definitely couldn't afford the $20 price tag per boutonniere so, I decided to come up with my own way to make them and then share the tutorial with all of you. Each boutonniere costs $1 or less so it's really affordable and easy to make.
Supplies needed:
I bought everything at the Dollar Tree except the M&Ms and boutonniere pins.
1 Bundle of fake baby's breath $1.00
(slide the baby's breath and leaves off of the stems)
1 Bundle of fake flowers $1.00 
(slide the flower heads and leaves off and cut the stem at the base with wire cutters)
1 Roll of floral tape $1.00
1 Box of sandwich bags $1.00
1 Roll of Scotch tape
M&Ms $2.89 at Aldis
1 Roll thin satin ribbon at Wal-Mart $0.97
Box of Boutonniere pins at Wal-Mart $3.00
1/4 cup measuring cup
Scissors
Wire Cutters


1. Cut the zip top off of the sandwich bag

2. Add 1/4 cup of M&Ms to the corner of the bag

3. Twist the bag really tight

4. Secure the tight twist by wrapping a piece of scotch tape securely around it

5. Take the floral stem and gently push it through the base of the "flower." Be careful not to puncture the bag out the other side. It's easy to do. Get the stem as far to the top of the bag as you can. It keeps the "flower" from falling over.

6. Secure the "flower" to the stem with a small piece of floral tape and trim off the excess sandwich bag where the floral tape ends. If you've never used floral tape before the trick is to stretch it tight as you wrap. That is what makes it stick.

7. Cut between the leaves to open the closed circle. This will make it easier to wrap around the base to secure to the "flower."

8. Wrap the leaves around the base under the "flower" and secure with a piece of Scotch tape 

9. Take the baby's breath and slide it up the stem. Position it at a height you like it and secure with floral tape. Cut the stem with wire cutters at the desired length and wrap the rest of the stem including the end with floral tape.

10. Now add some ribbon and you are done!

I hope you find this tutorial helpful and if you have any questions/suggestions please feel free to contact me. I think these turned out super cute and I know my husband can't wait to eat his!

*I don't mind you making your own but, please respect the work I've done here and not take my pictures or tutorial to your own site. Please refer your traffic here. I'd do the same for you. Thank you!


Monday, June 4, 2012

Shopping Trip June 4th 2012

I hit up CVS for my diaper deal today!! I am happy to report that it worked out great. I also went to Wal-Mart and scored some freebies. Here's the run down;


Walmart:
Kotex Pantiliners 22 count  $0.94 I bought 4 boxes and had (2) $2/2 boxes MC = $0.24 overage
Sierra Mist 2 Liter              $1.00 - $1 off MC courtesy of Facebook = FREE!
Brach's Gummi Bears         $1.28 I bought 2 bags and had  $1.50/2 bags MC = $0.53 per bag
Ball Fruit Pectin Flex Batch Pouch  $0.97 - $1.00MC = $0.03 overage
Total: $1.44    Would have paid: $8.95    Savings of: $7.51

Thanks to Katie at www.centralilsavings.com for posting these deals!!!


CVS:
Transaction 1:
Crest Prohealth Mouthwash   5.99 - $0.25MC get $5 ECBs  = $0.74
Hershey Bars (Singles) Buy 2 Get 1 Free ($1.19 each x6) - Buy 1 Get 1 Free MC = $2.58 or $0.43 each
Total: $9.26  Received: $5 ECBs   Saved: $5.71

Transaction 2:
Dean's Milk (2) $2.99 get $1 ECB Limit 2 = $1.99 each
Clear Shampoo $5.99 - $2.00MC - $1.00SC (Magic Coupon Machine) get $1 ECB = $1.99
Clear Conditioner  $5.99 - $2.00MC- $1.00SC (Magic Coupon Machine) get $1 ECB= $1.99
Used the $5 ECBs from #1
Total: $8.07  Received: $4 ECBs  Saved: $11.00

Transaction 3:
Pampers 2/$19 - $1.50MC x2 = 2/$16
Used the $15 ECBs from last weeks trip
Total: $1.35   Saved: $22.98

Total spent for the whole trip: $18.68  Plus I still have $4 ECBs for next time!! If I would not have used coupons I would have spent: $58.37

What's great about this is my family will use all these things. This is totally worth my time!!! I'd love to hear about the deals you found this week. Please don't hesitate to share and link up.

Saturday, June 2, 2012

Shopping Trip 6/1/12

I have taken an extended vacation from blogging and couponing. I am trying to get back on track so, please be patient with me. Last week was the first time in a long time that I actually did some deal shopping. The reason being was I had a great stockpile and I was trying to use it instead of going out and buying more stuff that I didn't need. That's the thing about couponing; you have to know when enough is enough. You also have to have room to store this stuff. Plus, you need to be able to use it up before it expires. So, I was down to 1 lonely tube of toothpaste in my stockpile 3 weeks ago. Time to hunt down some deals. I've also noticed that couponing in the Winter is not as great as it is right now. It seems like all the good coupons hibernate until the warm weather comes back around. Here are some of the deals I found this week;

CVS:
Transaction 1:
Crest Prohealth Toothpaste $4.79 get $3.00 ECB back. Limit 2 and I bought 2
M&Ms                               $0.75 get $0.75 ECB back. Limit 1
                                          Used $4.00 ECBs from previous trip
Total: $8.31     Received: $6.75 ECBs         Saved: $4.00

Transaction 2:
Physician's Formula Moisturizer  $14.49 get $15.00 ECB back (makes this $0.51 moneymaker)
                                                  Used the $6.75 ECBs from transaction 1
Total: $8.67   Received: $15.00 ECBs        Saved: $7.00

I spent a total of: $16.98 and left the store with $15 ECBs  So, I really only spent $1.98

This deal was tricky. The ad was very vague. It stated receive $15 ECBs when you buy ANY Physician's Formula Skin Care Item. It only excluded clearance items. None of the Physician's Formula items were tagged as this deal. The cashier had to manually give me the ECBs. So very grateful for a nice cashier!!

The reasons I bought the moisturizer were;
1. It's a free item and I needed moisturizer (especially with SPF 50. If you knew me you'd understand.)
2. I checked the site; www.iheartcvs.com for next weeks flyer and there is a great diaper deal

This next week CVS will have Pampers 2/$19. There are currently $1.50 manufacturer's coupons available on www.coupons.com. You can print 2. This would make the diapers 2/$16. So, then I'll use my $15 ECBs from this week and I'll only pay $1 plus tax out of my own pocket! It's a great way to stretch your money and buy the things that you really need for your family.

Wal-Mart:
Sun Drop Soda 2 liter   $1.00 - $1.00 MC (expires 6/3)
I bought 2 (2 liters) for $0.18

Walgreens:
Transaction 1:
Tecnu First Aid Gel  $7.00 get $7.00 RR back
Total: $7.07  Received: $7.00 RR   Saved: $2.99

Transaction 2:
Tone Bodywash Buy 1 at $4.79 Get 1 Free ( I bought 4)
I had 2 $1.00 MC plus I used the $7 RR
Total: $1.42      Saved: $18.58

I spent a total of $8.49

So, these are some of the deals I took advantage of. I hope you found some great deals too! I'd love to hear about them.

Wednesday, January 25, 2012

New Cleaning Closet

Besides the kitchen I spend most of my time in our utility room. It is also the room I have liked the least in this house. It is our catch all. Anything that needs to be taken outside or find a home ends up in here somewhere. Since we bought our house in 2006 we have made some major changes. The way I see it is if I have to spend time in there I might as well like it. So, here are some before and after pics and our most recent upgrade.
This is what it looked like when we bought it. The time stamp is wrong on the pic. Isn't it UGLY!? The curtains came with the house, lucky me! Those were the first to go.

Here's the most recent (today) pic. Lil man had to be in the pic of course. We painted and added a border and a ceiling fan. It made the room so much brighter.

     We uncovered a window and added tons of shelving. This house had no storage at all. When you live in a 1100 sq ft, 2 BR house you need all the storage you can get. I have been saving diaper and wipe boxes for storage and they will soon be getting a makeovers courtesy of pinterest. We still want to replace the vinyl flooring. Also, my handy husband is going to build me risers for my washer and dryer so, I can get rid of the sorting hamper and have more room. The cabinet by lil man is our pantry and it will be torn out and that whole corner will be turned into lockers. This room has really come a LONG way and there are just a few projects left to make it my dream utility room.

I want to replace this with a custom built pantry cabinet that goes to the ceiling. I don't want any wasted space. This is just our catch all for now. This is the best it's looked in a long time.

Here's the before of our most recent project; the cleaning closet. I can't believe I'm posting these. It's a disaster. I was always tripping over everything in there.

This cabinet contained a little bit of everything!

Here's a view from the inside. Not much space in there.

All the junk that didn't fit

Lucky for me Menards had a shelving sale and I have a handy husband! Bless his heart he used his Christmas money to help a girl out. Secretly, I think he was just tired of hearing me complain about it. The project cost a total of $60. It was so worth it! You can see the floor!

I can now find everything. I'm going to get some cute lil plastic containers to group some of the items together and of course label them. What you can't see in the pic is that there actually is still an empty shelf on top. I'm going to store paper towels up there. I know we should go paperless but, they are one thing I haven't been able to sacrifice.

Look, I have a tool hanger for my mop, broom, and swiffer. It's AWESOME!

I actually enjoy going in there now. Before it was complete and utter dread. I'm happy to have one more project marked off the honey do list and so is my husband.